SB's guide to installing your car rack
skip to:
Ski & Board Roof Racks
1 person install – 2 interchangeable pieces
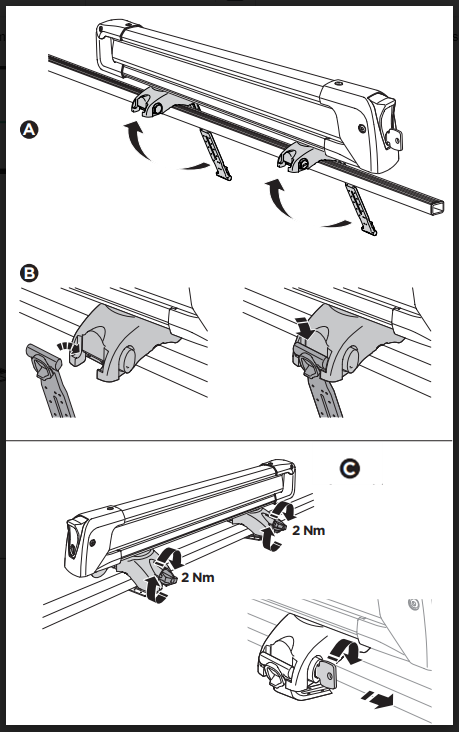
How to install your roof rack
- Align racks on cross bars so they open toward you
- (A) Pull strap under cross bars, (B) tuck, and (C) twist knob to tighten
- Lock racks to cross bars
- Note – distance between your cross bars must accommodate binding hardware. No part of bindings should be caught in rack clamps.
Using your roof rack:
- Open both racks
- Pair skis bottom to bottom and set them in the racks, with either tip pointed toward your taillights
- Close both racks until they click down as far a possible
- Lock racks to secure your skis
bike (Hanging) Hitch Racks
1 person install
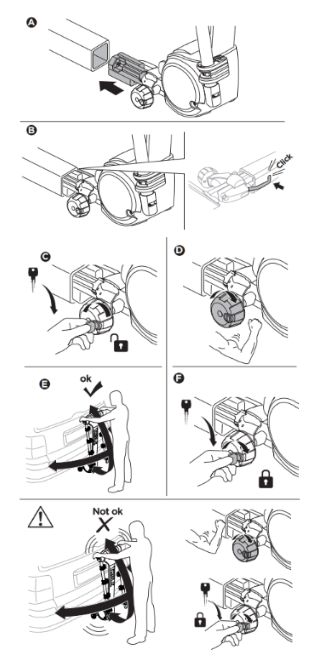
How to Install Your Haniging Hitch Rack
- Insert rack in hitch (A), make sure hitch pin clicks into hitch pin hole (B)
- Unlock tension knob with key (C)
- Twist knob until really tight! (D)
- Test rack stability (E). Repeat (D) if wobbly
- Lock tension knob (F)
Using your hitch rack:
- Lift the handle on top of rack and swing the arms up 90 degrees
- Lift and rest bike on the rack arms, handlebars on passenger side
- For multiple bikes, rack them largest bike first, all oriented the same way
- Using 3 straps, secure each bike’s top tube to the rack (x2) and to the seat tube (x1)
Bike (tray) hitch racks
1 person install
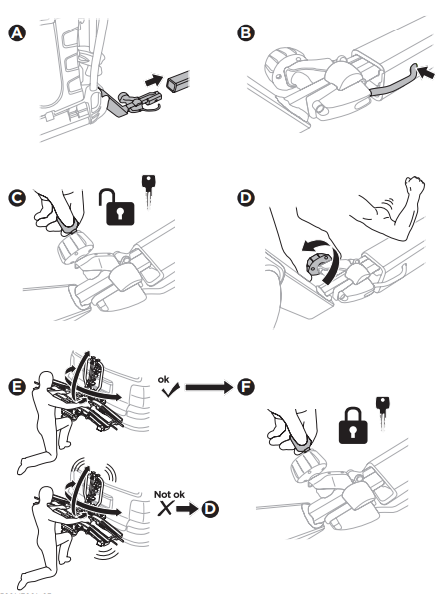
How to install your tray hitch rack
- Swing hitch connection down until it clicks
- Insert rack in hitch (A), make sure hitch pin clicks into hitch pin hole (B)
- Unlock tension knob with key (C)
- Twist knob until really tight! (D)
- Test rack stability (E) Repeat (D) if wobbly
- Lock tension knob (F)
Using your hitch rack:
- Unfold trays (do not stand on trays!)
- Stabilizer bars attached to rack can be removed and repositioned
- Squeeze clamps toward knobs to release Stabilizer bars from rack
- Place bike on rack, handle bars on passenger side
- Secure wheels to trays with straps
- Secure bike frame (top tube, down tube, seat tube) to rack with stabilizer bars
- Tighten and lock all tension knobs to secure bike
Cargo Boxes
2 person install - 1 box with 4 clamps
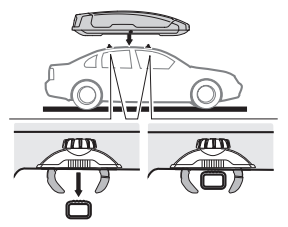
How to install your cargo box
- Open cargo box, open all 4 clamps widely, then shut cargo box.
- Lift and set box on roof, crossbars within the jaws of the open clamps
- Open box, twist knobs to tighten all clamps until they click
Using your cargo box:
- Secure all equipment inside box using straps provided
- Install while trunk/hatch is open to ensure proper placement
- Do not put straps on outside of box
- Do not exceed 80 mph
trunk racks
1 person install
how to install your trunk rack - saris bones 2
- Loosen knob on center arm and rotate upward. The tip of this arm will sit on the trunk lid, close to the rear windshield. Tighten knob.
- The two lower feet should rest against the truck, just above the bumper. Adjust center arm again to get the correct angle for your vehicle.
- 6 nylon straps have metal hooks labeled Upper, Lower, or Side. Upper hooks slide between trunk lid and rear windshield // Side hooks between trunk and tail lights // Lower hooks between trunk and bumper. Tighten all straps.
- Loosen knobs of remaining 2 rack arms,swing upward, then tighten.
- Open the 4 ratchet straps on top of rack, lift bike, and rest the top tube in strap cradles.Tighten ratchet straps over top tube.
- Secure third ratchet strap to bike frame to prevent swaying while in driving
- If carrying two bikes, alternate bike orientation on rack.
how to install your trunk rack - thule gateway pro 2
The Thule 900600 Gateway 2 Bike Trunk Mounted Bicycle Rack is designed to maximize the range of vehicles it will fit. The Gateway fastens to your vehicle safely and securely with six maximum-strength nylon straps and rubber coated metal hooks.
how to install your trunk rack - Thule gateway 2
- Open rack by holding both release levers while rotating upward. Adjust rack angle to fit your car
- Foam padding should only touch trunk/hatch metal - no glass, no plastics
- 6 nylon straps have metal hooks labeled Upper, Lower, or Side. Upper hooks slide between trunk lid and rear windshield // Side hooks between trunk and tail lights // Lower hooks between trunk and bumper. Tighten all straps
- Raise arms by releasing the plastic handle on the outside of the arm hinges.The handles double as tension knobs, twist to tighten, then replace handle to flush position
- Lift bike, and rest the top tube in the cradles.Tighten ratchet straps over top tube
- Use rubber straps to secure bike frame to rack